

Pressure Profiling Guide: Master Espresso Extraction
Table of Contents
- What Is Pressure Profiling in Espresso?
- The Three Phases of Espresso Extraction: Pre-Infusion, Ramp-Up, and Decline
- Pre-Infusion Espresso: Building the Foundation
- Flow Control Espresso vs. Pressure Profiling: Understanding the Difference
- Light Roast Espresso Profiling: Optimising for Brightness and Complexity
- Best Pressure Profiling Espresso Machines for Home and Commercial Use
- How to Program and Visualise Pressure Profiles
- Troubleshooting Flavour Defects with Pressure Profiling
Pressure Profiling Guide: Master Espresso Extraction
Last Updated: July 25, 2026
What Is Pressure Profiling in Espresso?
Pressure profiling allows you to dynamically adjust brewing pressure throughout extraction, rather than maintaining static 9 bars from start to finish. This technique lets you manipulate pressure curves to extract specific flavour compounds at precise moments, delivering reproducible, data-driven coffee crafting that transforms variables into ones you can actually control.
How Pressure Profiling Differs from Standard Extraction
Standard espresso machines apply 9 bars of pressure for 25-30 seconds, leaving enormous flavour potential untapped. Pressure profiling treats extraction as three distinct phases: low-pressure saturation, ramp-up to peak pressure, then decline. This graduated approach addresses a fundamental problem: coffee particles dissolve at different rates depending on size and water contact.
Profiled shots taste balanced and complex because the pressure curve is engineered for that specific coffee, whereas standard shots often taste either sour (under-extracted) or bitter (over-extracted).
The Three Phases of Espresso Extraction: Pre-Infusion, Ramp-Up, and Decline
Each extraction phase serves a distinct purpose, and manipulating pressure within each phase directly controls which flavour compounds end up in your cup.
Phase 1: Pre-Infusion and Puck Saturation
Pre-infusion begins when water contacts the coffee puck. Rather than immediately hitting full pressure, you hold the pump at 1-2 bars for 5-10 seconds, allowing water to saturate the entire puck uniformly. This prevents channelling, when water finds the path of least resistance through the puck, creating a tunnel that allows water to bypass most of the coffee, resulting in sour, thin shots.
Coffee particles swell when they absorb water. During pre-infusion, water penetrates slowly, and particles expand evenly. By the time you ramp pressure, the puck is consolidated and uniform, blocking water from taking shortcuts.
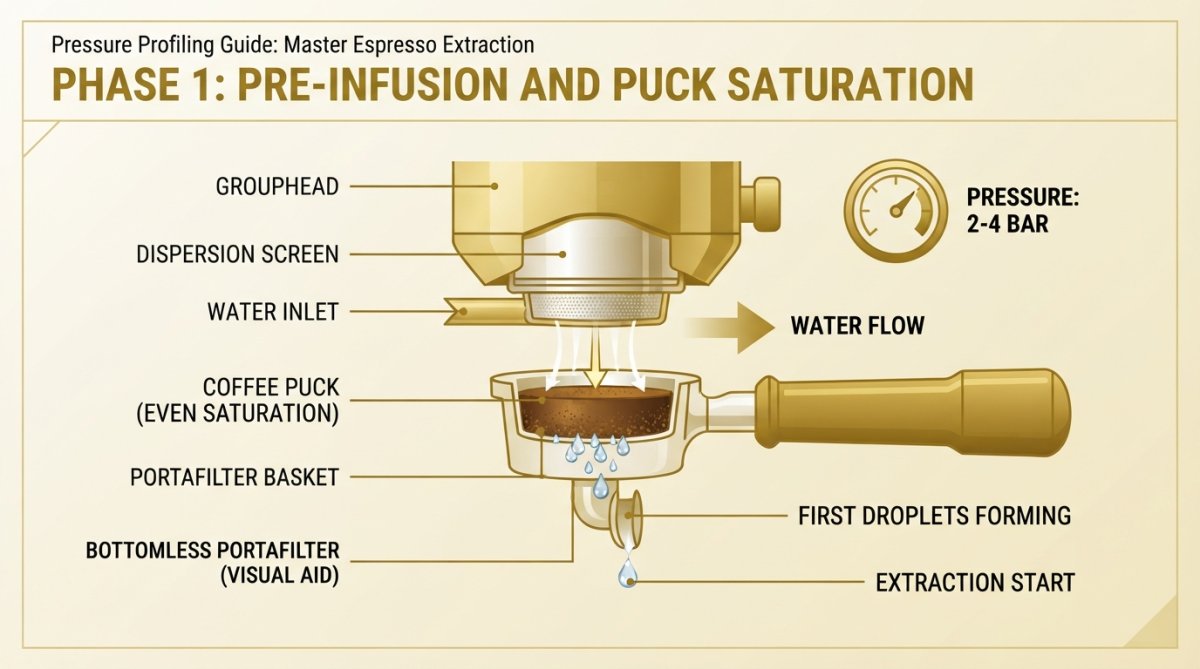
Testing this is simple: pull a shot with no pre-infusion on a light roast, then the same coffee with 8 seconds of pre-infusion at 2 bars. The pre-infusion shot tastes sweeter, more balanced, and noticeably less sour.
Phase 2: Ramp-Up to Peak Pressure
After pre-infusion, gradually increase pressure from 2-3 bars up to 9 bars over 5-8 seconds. This ramp-up phase controls the rate at which soluble compounds dissolve from the coffee into the water. A fast ramp (reaching 9 bars in 3 seconds) extracts quickly and emphasises early, bright flavours. A slow ramp (reaching 9 bars in 10 seconds) extends extraction time and pulls more complex, developed flavours. For light roasts, a slower ramp often works better because it allows delicate floral and fruity notes to express fully before bitter compounds dominate.
Phase 3: Decline Phase and Flow Control
Rather than maintaining 9 bars until the shot ends, gradually reduce pressure in the final 5-10 seconds. This prevents over-extraction and gives you control over the finish flavour. As water flows through the puck, it becomes increasingly saturated with dissolved solids. By declining pressure, you slow the flow rate and stop extraction before harsh, astringent compounds fully dissolve.
Pre-Infusion Espresso: Building the Foundation
Pre-infusion espresso has become standard practice in specialty cafés because it solves the most common extraction problem: inconsistency. You apply 1-2 bars of pressure for 5-15 seconds before ramping to full pressure. During this time, water saturates the puck uniformly, particles swell, and the bed consolidates.
Duration matters. Too short (under 3 seconds) and you haven't saturated the puck fully. Too long (over 15 seconds) and you're extracting without pressure, which wastes time and cools the puck. Most specialty baristas find 5-10 seconds optimal for medium grind sizes. Temperature also affects pre-infusion effectiveness: hotter water saturates faster, so you can shorten pre-infusion above 92°C, whilst cooler water (88-90°C) benefits from slightly longer pre-infusion.
Flow Control Espresso vs. Pressure Profiling: Understanding the Difference
Flow control espresso uses a needle valve to restrict water flow through the grouphead. By closing the needle valve, you reduce the flow rate and pressure, giving you real-time, manual control over extraction. You can adjust based on how the shot tastes mid-pull.
Pressure profiling espresso uses a pre-programmed pressure curve. Modern machines with PID controllers and pressure transducers allow you to define exactly what pressure you want at each second of extraction. The machine executes the curve automatically, delivering consistent results shot after shot.
For home use, flow control often makes more sense. Manual lever machines cost significantly less than PID-equipped dual boilers, and the learning curve is gentler. For commercial settings or high-volume home baristas, pressure profiling's consistency justifies the equipment investment.
Light Roast Espresso Profiling: Optimising for Brightness and Complexity
Light roast espresso profiling requires a fundamentally different pressure curve than dark roasts. Light roasts are denser, more acidic, and more brittle. They need gentler treatment to avoid astringency whilst still extracting the delicate floral and fruity notes that define light roast character.
Extend pre-infusion to 8-12 seconds at 1-1.5 bars because the denser bean structure resists water penetration. A slow ramp (reaching 9 bars over 10-12 seconds) allows bright acidity to extract before woody, bitter compounds dominate. Use slightly longer shot times (28-35 seconds rather than 25-28 seconds) and a gentler pressure curve to give light roast's delicate compounds time to dissolve without over-extracting harsh flavours.
Extraction Yield and Solubility in Light Roasts
Extraction yield, the percentage of the coffee's mass that ends up dissolved in the cup, ties pressure profiling to flavour. For light roasts, target extraction yields of 20-22%. Light roasts reach their sweet spot at higher extraction yields because their acidity is more pronounced.
Solubility is the underlying mechanism. Coffee solubility increases with temperature and pressure. At 9 bars and 92°C, roughly 20-22% of light roast coffee dissolves into water. By adjusting pressure curves, you control which compounds dissolve and in what order.
Measuring extraction yield requires a refractometer to measure total dissolved solids (TDS) in the espresso. But you don't need expensive equipment to apply this principle: taste your shots and adjust. If a light roast tastes sour, extend the shot time slightly. If it tastes bitter, shorten it or reduce pressure in the decline phase.
Best Pressure Profiling Espresso Machines for Home and Commercial Use
Choosing a machine for pressure profiling depends on your budget, space, and desired level of control.
Machines with PID and Pressure Transducer Technology
PID-equipped dual boiler machines represent the gold standard for programmable pressure profiling. These machines maintain precise water temperature within ±0.5°C and include pressure transducers that measure actual pump pressure in real time. You programme a pressure curve into the machine's interface, and it executes the curve automatically on every shot.
The [Sage The Oracle Dual Boiler Espresso Machine](https://s2xhx9-w0.myshopify.com/products/sage-the-oracle-dual-boiler-espresso-machine-stainless-steel) combines PID temperature stability with dual boilers (one for espresso, one for steam), allowing you to pull shots and steam milk simultaneously without temperature fluctuation. The Sage Oracle Touch Espresso Machine adds touchscreen control and fully automated milk texturing. The Graef Estessa Espresso Machine features dual pumps and programmable pressure profiling with needle valve refinement, bridging manual lever intuition and automated profiling.
| Machine | Pressure Control | Temperature Stability | Best For |
|---|---|---|---|
| Sage Dual Boiler | PID-programmed curves | ±0.5°C | Consistency-focused home baristas |
| Sage Oracle | Automated + touch interface | ±0.5°C | Convenience + precision seekers |
| Graef Estessa | Dual pump + needle valve | PID-controlled | Maximum control enthusiasts |
Manual Lever Machines and Needle Valve Control
Manual lever machines offer unmatched profiling control at a fraction of the cost of PID-equipped machines. By pulling a lever, you directly control pump pressure, allowing you to create any pressure curve you imagine mid-shot. This real-time feedback teaches you how pressure affects extraction in ways automated machines cannot.
The trade-off is consistency. Pulling identical pressure curves shot after shot requires practice. However, once you develop the muscle memory, manual machines deliver profiling results equal to PID machines, with the added benefit of real-time adjustability. For home baristas unwilling to spend significantly on a dual boiler, manual or needle valve machines represent the best value for pressure profiling.
How to Programme and Visualise Pressure Profiles
Programming a pressure profile requires understanding your machine's interface and having a clear mental model of what you want to achieve. Most PID-equipped machines allow you to define pressure at 1-second intervals.
Step-by-Step: Creating Your First Pressure Curve
Step 1: Define your target extraction time. Decide whether you want a 25-second, 30-second, or 35-second shot. Light roasts often benefit from longer times; dark roasts shorter.
Step 2: Set pre-infusion pressure and duration. Start with 1.5 bars for 8 seconds. You'll adjust based on results.
Step 3: Programme the ramp. From second 8 to second 15, gradually increase pressure from 1.5 bars to 9 bars. For light roasts, extend to 10-12 seconds.
Step 4: Hold peak pressure. From second 15 (or 18 for light roasts) until 5 seconds before your target end time, maintain 9 bars.
Step 5: Programme the decline. In the final 5 seconds, reduce pressure from 9 bars to 3 bars.
Step 6: Pull a test shot. Observe the flow rate, taste the espresso, and measure TDS if you have a refractometer.
Step 7: Adjust and iterate. If the shot tastes sour, extend the ramp or hold peak pressure longer. If it tastes bitter, shorten the shot time or reduce peak pressure.
Reading Extraction Data and Total Dissolved Solids (TDS)
Total dissolved solids (TDS) measures the percentage of espresso that consists of dissolved coffee solids. A refractometer measures TDS by analysing how light refracts through the espresso. Most specialty espresso falls between 8-12% TDS, with 9-10% representing the sweet spot for balanced flavour.
TDS combined with shot time reveals extraction yield, which correlates strongly with flavour balance. The formula is: extraction yield = (espresso weight × TDS) ÷ (dry coffee weight) × 100. If you use 20g of coffee and produce 40g of espresso at 10% TDS, your extraction yield is 20%.
Using TDS data, you can adjust pressure profiles scientifically. If extraction yield is 18% and the shot tastes sour, extend extraction time or increase pressure to dissolve more solids. If yield is 22% and the shot tastes bitter, reduce extraction time or lower pressure.
Troubleshooting Flavour Defects with Pressure Profiling
Pressure profiling's power lies in its ability to diagnose and fix specific flavour problems.
Sour Shots: Adjusting Pre-Infusion Duration
Sour espresso tastes sharp, acidic, and thin due to under-extraction. The first fix is extending pre-infusion by 2-3 seconds. If sourness decreases, you've found the problem. If extended pre-infusion doesn't help, slow your ramp by increasing the time spent ramping from 1.5 bars to 9 bars from 7 seconds to 10-12 seconds. Finally, extend your total shot time by 3-5 seconds to allow more solids to dissolve.
Bitter Shots: Managing the Decline Phase
Bitter espresso tastes harsh and astringent due to over-extraction. The most effective fix is introducing or steepening your decline phase. If you're currently maintaining 9 bars until the shot ends, programme a decline that reduces pressure to 4-5 bars in the final 8 seconds. Alternatively, reduce your total shot time by 3-5 seconds, or coarsen your grind slightly.
Mastering pressure profiling espresso transforms how you approach coffee extraction. Rather than hoping your grind, dose, and tamping align perfectly, you're now engineering the pressure curve to extract specific flavour compounds at precise moments. This systematic approach removes guesswork and makes café-quality espresso reproducible at home.
Coffee Craft Studio's range of pressure profiling espresso machines, including the [Sage The Dual Boiler Espresso Machine](https://s2xhx9-w0.myshopify.com/products/sage-the-dual-boiler-espresso-machine) and Graef Estessa, delivers the precision and temperature stability that profiling demands. Whether you choose automated PID curves or manual lever control, the principle remains: match your pressure curve to your coffee's characteristics, measure your results, and iterate. That discipline separates exceptional espresso from ordinary shots.
Frequently Asked Questions
What is pressure profiling in espresso and why does it matter?
Pressure profiling is the deliberate manipulation of bar pressure throughout the espresso extraction process to optimise flavour and extraction yield. Rather than maintaining constant pressure, profiling adjusts pressure through distinct phases, pre-infusion, ramp-up, and decline, to control flow rate, puck saturation, and solubility. This technique matters because it allows baristas to extract more complexity from coffee, reduce channeling, and tailor shots to specific roast profiles or bean characteristics, resulting in cleaner, more balanced cups.
How does pre-infusion espresso improve my shots?
Pre-infusion applies low pressure (typically 1-3 bar) before ramping to full pump pressure. This phase saturates the puck evenly, allowing brew water to penetrate coffee grounds gradually rather than forcing through weak points, which causes channeling and sour flavours. Pre-infusion extends shot time slightly but dramatically improves puck saturation and extraction consistency, particularly with light roasts and finely ground coffee where uneven wetting is most problematic.
What is the difference between flow control espresso and pressure profiling?
Flow control regulates the volume of water flowing through the puck by restricting outlet flow, while pressure profiling controls the pressure applied to the puck itself. Flow control is simpler and available on many machines; pressure profiling requires more sophisticated equipment like PID controllers or manual needle valves. Both achieve similar results, improved extraction and flavour, but profiling offers greater precision and repeatability, making it preferred by specialty coffee professionals.
Which espresso machines offer the best pressure profiling capabilities?
Machines with dual boiler systems, PID temperature control, and pressure transducers provide excellent profiling. The Sage Dual Boiler and Graef Estessa both deliver professional-grade pressure profiling suitable for home enthusiasts. Manual lever machines also excel at profiling through operator control of needle valves, though they require more skill. For automated profiling, look for machines with integrated pressure curves and digital interfaces that allow you to program and visualise your extraction profile precisely.
Is pressure profiling suitable for beginners, or do I need professional training?
Pressure profiling can be learned by home enthusiasts without formal training, though understanding the basics, pre-infusion, ramp-up, decline phases, and how grind size affects flow, accelerates the learning curve. Start with simple profiles: extend pre-infusion to reduce sour notes, or adjust decline phase to manage bitterness. Most machines with profiling capability include guides or online resources. Experimenting with one variable at a time and tasting the results is the most effective learning method.
How does light roast espresso profiling differ from darker roasts?
Light roasts have denser, less soluble structure, requiring longer pre-infusion and more gradual pressure ramps to achieve balanced extraction without sour or astringent flavours. Darker roasts extract more readily and benefit from shorter pre-infusion and steeper pressure curves. Light roast profiling typically involves extended shot times (28-32 seconds) with careful management of the decline phase to maximise dissolved solids (TDS) without over-extraction. Grind size and brew ratio adjustments are also more critical with light roasts.
Can I use pressure profiling on machines without PID or pressure transducers?
Yes. Manual lever machines and machines with needle valves allow operator-controlled profiling through hand technique, though consistency requires skill and practice. Some budget-friendly hacks include using pre-infusion baskets, adjusting tamping pressure, or modifying grind size to simulate pressure curves. However, machines with digital pressure monitoring (PID, transducers) provide repeatable, visualised profiles that make learning and troubleshooting significantly easier and more reliable.
This article was written using GrandRanker