

How to Steam Milk Properly: A Barista's Guide
Table of Contents
- What You'll Need to Steam Milk Properly
- How to Use a Steam Wand: Pre-Steaming Preparation
- Milk Steaming Temperature Guidelines
- The Two-Phase Technique: Aeration and Texturing
- Steaming Milk for Latte Art: Technique and Timing
- Plant-Based Milk Steaming: Adapting Your Technique
- Common Mistakes to Avoid When Steaming Milk
- Cleaning and Maintaining Your Steam Wand
How to Steam Milk Properly: A Barista's Guide
Last Updated: July 28, 2026
Learning how to steam milk properly transforms your espresso drinks from acceptable to exceptional. At Coffee Craft Studio, we've spent years helping home enthusiasts and professional baristas master this fundamental skill. The difference between mediocre microfoam and silky, velvety milk comes down to understanding a few key principles and practising the right technique consistently.
What You'll Need to Steam Milk Properly
Essential Equipment: Steam Wand and Milk Jug
Steaming milk properly requires specific tools. The steam wand is a thin metal tube that releases pressurised steam directly into cold milk. Some machines feature single-hole wands that produce basic results, whilst others include multi-hole designs that distribute steam more evenly and create better microfoam consistency.
Your milk jug (or pitcher) matters equally. Straight-sided jugs with a pouring spout work best for learning because they allow you to see exactly what's happening inside as you steam. A belly jug, wider in the middle and narrower at the top and bottom, creates turbulence that helps incorporate air more effectively than a uniformly cylindrical pitcher.
Look for jugs with a thermometer-friendly design. Some baristas prefer integrated thermometers, whilst others use separate instant-read thermometers clipped to the pitcher's side. Either approach works, but you need visibility into milk temperature to avoid burning or under-steaming.
Choosing the Right Milk for Steaming
Whole milk remains the gold standard because its fat content creates naturally velvety texture and helps stabilise the foam. Full-fat milk (around 3.5-4% fat) produces the smoothest, most stable microfoam that pours beautifully for latte art.
Semi-skimmed milk (around 1.5-2% fat) steams acceptably but produces slightly less stable foam. Skimmed milk struggles because the absence of fat means bubbles collapse more easily.
Temperature matters before you even start steaming. Cold milk, straight from the fridge, steams more predictably than room-temperature milk. Many baristas keep their milk jugs in the freezer for 15-20 minutes before steaming to maximise this window.
Plant-based alternatives have become increasingly popular, and steaming them requires adaptation. Oat milk, soy milk, and almond milk each behave differently, which we'll cover in detail in a later section.
How to Use a Steam Wand: Pre-Steaming Preparation
Purging the Steam Wand
Before introducing milk to your steam wand, always purge it. This means releasing steam for 2-3 seconds into an empty container or waste pitcher. Purging removes water that's condensed inside the wand during the idle period between drinks.
Water inside the wand dilutes your milk and disrupts the steaming process. A quick purge prevents this entirely. Hold a small cup directly under the wand and activate the steam valve fully for 2-3 seconds.
After purging, wipe the steam wand with a damp cloth immediately. Milk residue hardens quickly once it contacts the hot metal, and dried milk inside the wand creates blockages.
Positioning for Success
Position the steam wand so its tip sits just below the milk surface when you first submerge the jug. Too deep and you'll create large, unstable bubbles; too shallow and steam escapes without aerating the milk effectively.
The wand should angle slightly toward the pitcher's side wall, not point straight down at the milk's centre. This angled position creates a whirlpool effect, essential because it distributes heat evenly and prevents hot spots where milk burns.
Hold the pitcher at a slight angle (about 20 degrees) rather than perfectly vertical. As the milk level rises during steaming, you'll gradually lower the pitcher slightly to maintain that critical position just below the surface.
Milk Steaming Temperature Guidelines
Steam milk properly by understanding target temperatures. The ideal serving temperature for most espresso drinks is between 60-65°C. However, your steaming process should take the milk to approximately 65-70°C because it continues heating slightly after you remove the steam wand.
Many baristas use the "too hot to hold" test: when you can no longer comfortably hold the pitcher's side, you've reached approximately the right temperature. A thermometer provides more precision.
Never exceed 70°C during steaming. Beyond this point, proteins denature and the milk develops a burnt, unpleasant taste. The steaming process typically takes 20-30 seconds for a standard 350ml pitcher of cold milk.
The Two-Phase Technique: Aeration and Texturing
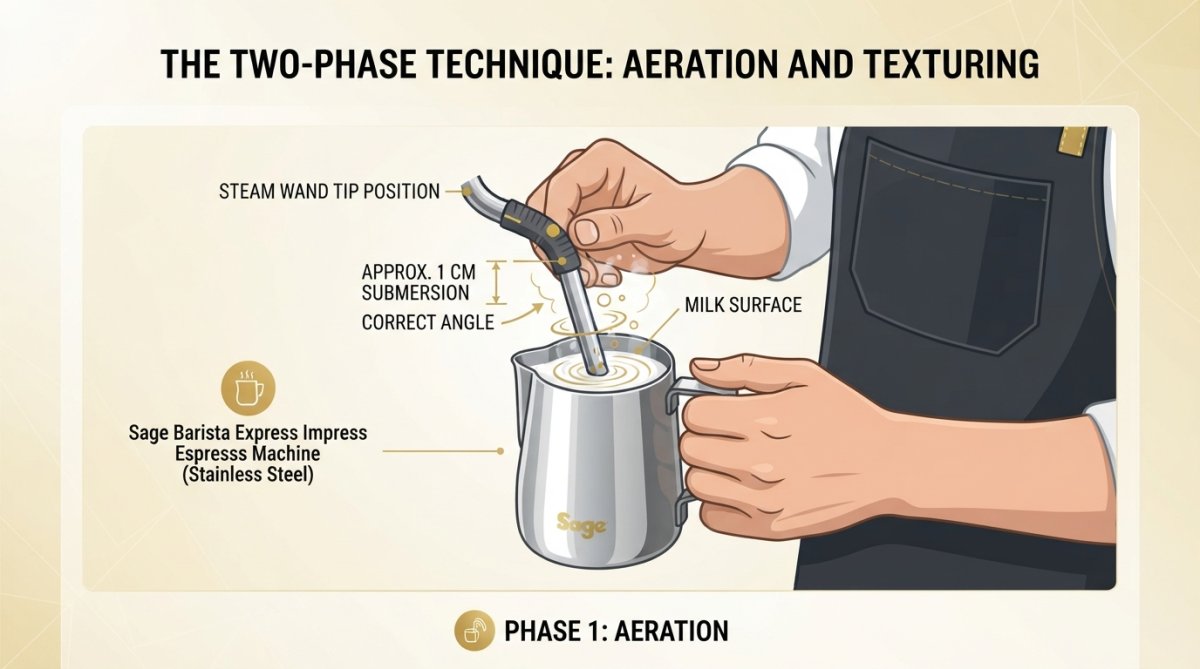
Steam milk properly by dividing the process into two distinct phases. The first phase, aeration, incorporates air into the milk. During this phase, you'll hear a distinctive hissing sound as steam and air mix. The milk's volume increases noticeably; you should see the level rise by roughly one-third.
Position the steam wand so its tip sits just at the milk surface during aeration. You want the wand to pull air into the milk rather than push steam deep below the surface. Maintain this position for approximately 5-8 seconds. Watch for the milk level rising steadily; when it's risen by about a third, you've incorporated enough air.
Phase 2: Texturing and Building Velvety Consistency
Once you've incorporated sufficient air, submerge the steam wand deeper into the milk, about 1cm below the surface. This deeper position forces the milk to circulate through the vortex you've created, breaking down the large bubbles into progressively smaller ones.
During this texturing phase, the milk should feel noticeably warmer. The hissing sound diminishes or disappears entirely because you're no longer pulling air in. This phase typically lasts 10-15 seconds, depending on how much milk you're steaming.
The texturing phase transforms rough, bubbly foam into microfoam, tiny, uniform bubbles suspended throughout the milk. Microfoam pours like liquid rather than sitting on top of the milk. Watch the milk's surface during texturing; you should see a smooth, shiny appearance developing and the milk should rotate smoothly in a whirlpool pattern.
Steaming Milk for Latte Art: Technique and Timing
Creating microfoam for latte art requires slightly different technique than steaming for cappuccinos. Latte art demands exceptionally smooth, pourable microfoam with minimal large bubbles.
To achieve this consistency, extend your texturing phase slightly longer than you would for a cappuccino. Aim for 15-20 seconds of texturing after your initial aeration phase. The additional time breaks down bubbles further, creating finer microfoam.
Temperature control becomes critical for latte art. You want to reach approximately 65-68°C, slightly cooler than cappuccino temperature. This slightly lower temperature means the milk flows more freely when you pour, giving you better control for creating patterns.
The milk's consistency should be identical throughout, with no separation between foam and liquid. Stop steaming when the milk reaches your target temperature. Remove the wand slowly and smoothly, then pour the milk within 10-15 seconds. Microfoam begins to separate if you wait too long.
Plant-Based Milk Steaming: Adapting Your Technique
Understanding Plant-Based Milk Behaviour
Plant-based milks behave fundamentally differently from dairy milk because they contain different proteins and fats. Oat milk has become the most popular alternative because it steams reasonably well, though it's typically less stable than dairy milk microfoam and separates more quickly.
Soy milk creates surprisingly good microfoam because soy proteins behave similarly to dairy proteins. However, soy milk can scald easily and develop a bitter taste if overheated. Keep temperatures slightly lower than you would with dairy milk, aiming for 60-65°C rather than 65-70°C.
Almond milk steams poorly because it contains very little protein. The foam created is usually large, unstable bubbles rather than true microfoam. Coconut milk often separates during steaming, creating an oily layer that doesn't incorporate smoothly.
Adjusting Temperature and Timing
Plant-based milks typically require slightly longer steaming times than dairy milk because they heat more slowly. A cold jug of oat milk might take 30-40 seconds to reach proper temperature, compared to 20-30 seconds for dairy milk.
Reduce your aeration duration slightly. Plant-based milks incorporate air more readily than dairy milk, so 3-5 seconds of aeration often suffices instead of 5-8 seconds. Extend your texturing phase accordingly to break down bubbles and incorporate heat.
Temperature control is critical. Most plant-based milks scald at lower temperatures than dairy milk. Watch carefully as you approach 65°C; you may need to stop steaming 2-3 degrees below your normal target temperature because the milk continues heating after you remove the wand.
Common Mistakes to Avoid When Steaming Milk
The most frequent mistake is positioning the steam wand too deep during aeration. When the wand is submerged, you're heating the milk rather than aerating it. Listen for the hissing sound; it's your confirmation that you're aerating correctly.
Another common error is stopping too early. Many people remove the steam wand before they've adequately textured the milk. If your milk pours in distinct foam and liquid layers, you haven't textured long enough.
Overheating is surprisingly common, especially on powerful commercial machines. Milk that exceeds 70°C develops a burnt taste and grainy texture. You must start with fresh milk to recover from this.
Inconsistent wand positioning creates inconsistent results. Keep your positioning steady and make only small, deliberate adjustments as the milk level rises.
Neglecting to purge the steam wand before steaming introduces water into your milk. A two-second purge prevents this entirely.
Not wiping the steam wand immediately after steaming allows milk to harden on the nozzle. A quick wipe takes five seconds and saves future headaches.
Cleaning and Maintaining Your Steam Wand
Proper steam wand maintenance ensures consistent performance and prevents bacterial growth. Clean your wand immediately after every use.
The basic cleaning process takes 30 seconds. First, purge the wand for 2-3 seconds to clear any milk inside. Then wipe the outside thoroughly with a damp cloth, paying particular attention to the tip.
Once weekly, perform a deeper clean. Soak the removable parts (if your wand disassembles) in hot water with a small amount of espresso machine cleaner for 15-20 minutes. After soaking, rinse thoroughly with hot water and reassemble.
If your steam wand doesn't disassemble, use a cleaning brush specifically designed for steam wands. Insert the brush gently and move it back and forth, then purge steam to flush out loosened debris.
Monthly descaling prevents mineral buildup that reduces steam pressure. Use a commercial espresso machine descaling solution according to the manufacturer's instructions.
Signs that your steam wand needs professional cleaning include reduced steam pressure, uneven steam distribution, or persistent blockages that regular cleaning doesn't resolve.
Learning how to steam milk properly is a skill that improves with practice. The technique combines understanding your equipment, recognising the sensory cues (sound, temperature, visual appearance), and making small adjustments based on results. Most people achieve competent results within a few weeks of consistent practice.
For those serious about mastering espresso drinks, investing in quality equipment makes a significant difference. The Sage Oracle Espresso Machine provides professional-grade steam power and temperature stability that makes learning easier. Alternatively, the Sage Barista Express Impress offers excellent value for home users developing their skills. Coffee Craft Studio stocks both machines, along with accessories specifically designed to help you steam milk properly, from precision thermometers to purpose-built milk jugs that make the learning process more intuitive. Start with quality equipment and consistent technique, and you'll create café-quality milk drinks that rival your local coffee shop.
| Steaming Phase | Duration | Key Action | Audio/Visual Cue |
|---|---|---|---|
| Purging | 2-3 seconds | Release steam into waste container | Burst of steam, possibly water droplets |
| Aeration | 5-8 seconds | Position wand at milk surface | Steady hissing sound, milk level rises |
| Texturing | 10-15 seconds | Submerge wand 1cm below surface | Hissing stops, smooth whirlpool visible |
| Temperature Check | Ongoing | Monitor with thermometer or touch test | Milk reaches 65-70°C |
Frequently Asked Questions
What is the ideal milk steaming temperature for espresso drinks?
The ideal temperature for steaming milk is between 60°C and 65°C. Use a thermometer to monitor progress; milk begins to burn above 70°C. For cappuccinos, aim for the lower end; for lattes, the higher end provides smoother texture. Always start with cold milk from the fridge to give yourself time to develop microfoam before reaching target temperature.
How do I create microfoam when steaming milk properly?
Microfoam develops during the aeration phase. Position your steam wand just below the milk surface to introduce small bubbles rather than large ones. Listen for a gentle hissing sound, not a loud roar. Tilt the jug to create a whirlpool, which helps distribute heat evenly and breaks down bubbles into fine, velvety microfoam. This takes 3-5 seconds of aeration before submerging deeper.
Can I steam plant-based milk using the same technique as cow's milk?
Plant-based milks require slight adjustments. They're more prone to burning, so keep temperatures between 55°C and 60°C. Oat and soya milk steam well; almond milk produces less stable foam. Use a straight-sided milk jug for better control, and watch closely during steaming, plant-based milk heats faster. Avoid excessive aeration, as these milks break down more easily than dairy milk.
What are the most common mistakes when steaming milk?
The biggest mistakes are: not purging the steam wand before steaming, which introduces water; submerging the wand too deep too early, creating large bubbles instead of microfoam; overheating milk above 70°C, which burns it and ruins texture; and failing to create a whirlpool, which leaves inconsistent texture. Also avoid using warm milk, always start with cold milk to maximise steaming time and control.
This article was written using GrandRanker