

Cold Foam vs Steamed Milk for Coffee
Last Updated: October 22, 2026
Quick Summary
Cold foam vs steamed milk for coffee differs in temperature and texture: cold foam is aerated milk without heat that sits atop iced drinks, whilst steamed milk is heated with incorporated air to create microfoam that blends into hot espresso drinks. Cold foam requires minimal equipment and suits cold beverages, whereas steamed milk demands a steam wand and is essential for lattes, cappuccinos, and flat whites.
- Cold foam is made by frothing cold milk without heat using a mechanical frother, taking 2 to 3 minutes to prepare.
- Steamed milk requires a steam wand and takes 60 to 90 seconds, with an air incorporation phase of 3 to 5 seconds followed by heating.
- Whole milk and oat milk froth best for cold foam due to fat content and protein structure.
- The ideal steaming temperature range is 55 to 75 degrees Celsius to develop sweetness and avoid scalding.
- Cold foam excels with iced coffee and cold brew, whilst steamed milk is essential for hot espresso-based drinks.
Table of Contents
- Cold Foam vs Steamed Milk: Key Differences at a Glance
- How to Make Cold Foam at Home
- How to Steam Milk for Coffee
- Best Milk for Cold Foam
- Milk Steaming Temperature and Control
- Which Should You Choose: Cold Foam or Steamed Milk?
- Frequently Asked Questions
Cold Foam vs Steamed Milk: Key Differences at a Glance
Cold foam and steamed milk are two distinct methods for adding texture and richness to coffee drinks. Understanding the difference between cold foam vs steamed milk for coffee helps you choose the right technique for your brewing style and preferred beverages.
Cold foam is aerated milk created without heat, using a frother to whip cold or room-temperature milk into light, airy bubbles.
At Coffee Craft Studio, we work with home baristas and professionals who care about the precision of their milk preparation. The choice between these two methods depends on your drink type, equipment, and the mouthfeel you're after.
What Each One Is
Cold foam is milk that has been frothed at room temperature or chilled, creating a light, cloud-like layer. It's made by aerating milk without applying heat, so the milk stays cold and the bubbles remain large and stable.
Steamed milk, by contrast, is heated to a specific temperature whilst air is introduced through a steam wand. This process creates microfoam, where tiny bubbles integrate throughout the milk, creating a silky, velvety texture. Steamed milk mixes with espresso to form drinks like lattes, cappuccinos, and flat whites.
How They're Made
Cold foam requires aeration but no heat. You introduce air into cold milk using a mechanical frother, creating bubbles that remain distinct and light. The milk stays cold, so the foam sits stably on top of your drink.
Steamed milk involves two simultaneous actions: heating and aeration. A steam wand introduces air whilst raising the milk's temperature, creating smaller, more uniform bubbles that integrate throughout the liquid. The result is silky microfoam that pours smoothly and blends with espresso.
How to Make Cold Foam at Home
Creating cold foam at home is straightforward and requires minimal equipment. The process takes just a few minutes and produces a professional-looking layer for iced drinks.
Equipment You'll Need
A milk frother is essential. You have several options: an electric handheld frother (simple and affordable), a manual milk frother with a plunger mechanism, or even a jar with a tight-fitting lid that you shake vigorously. For the best results, use a frother designed specifically for cold frothing, as some electric models work better with cold milk than others.

You'll also need cold milk or milk at room temperature. Whole milk froths more easily than skimmed milk, but any dairy or plant-based milk works. Pour your milk into a clean container, leaving space at the top for the foam to expand.
Step-by-Step Process
Step 1: Pour your milk. Fill your frother jug or container about one-third full with cold milk.
Step 2: Froth the milk. If using an electric frother, submerge the whisk briefly at the surface of the milk and switch it on.
Step 3: Let it settle. Stop frothing once you've created a thick layer of foam. The foam will continue to expand slightly.
Step 4: Pour into your drink. Tilt your cup and pour the steamed milk first, then spoon the foam on top.
The entire process takes 2 to 3 minutes. Cold foam is ideal for iced coffee, cold brew, and even poured over hot espresso for contrast.
How to Steam Milk for Coffee
Steaming milk properly requires practice, but the technique becomes intuitive once you understand the mechanics. The goal is to create microfoam, tiny, uniform bubbles integrated throughout the milk, whilst heating to the correct temperature.
Essential Equipment
You need an espresso machine with a steam wand. The steam wand delivers pressurised steam that heats and aerates milk simultaneously.
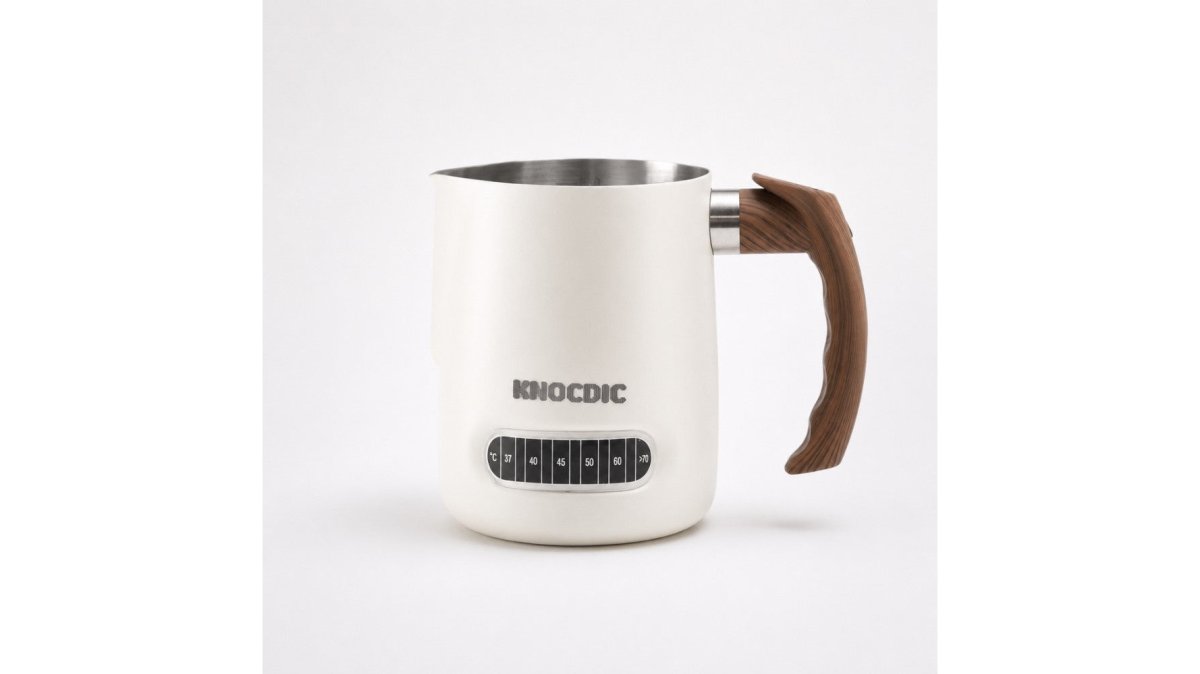
For better temperature control, a milk pitcher with a built-in thermometer is invaluable. The 600ml Milk Frothing Pitcher with Thermometer from our range includes a thermometer strip, helping you monitor milk temperature and avoid overheating.

Step-by-Step Steaming Technique
Step 1: Fill your pitcher. Pour cold milk into your stainless steel pitcher, filling it about one-third full.
Step 3: Introduce air (stretching). For the first 3 to 5 seconds, keep the wand tip at the surface. You'll hear a sharp hissing sound as air enters the milk. This "stretching" phase is where you incorporate air into the milk, creating the foundation for microfoam.
Step 4: Submerge and heat. Once you've stretched the milk, push the steam wand deeper into the pitcher.
Step 5: Remove and tap. Turn off the steam wand and remove the pitcher.
Step 6: Pour into espresso. Pour the steamed milk into your espresso cup, tilting the cup slightly.
The entire process takes 60 to 90 seconds. Consistency comes with repetition, each time you steam, you refine your technique.
Sinoova S1 All-in-One Multi-Foam Beverage Brewer – Automatic Milk Micro-Foamer →
| Technique | Time | Key Focus |
|---|---|---|
| Air incorporation (stretching) | 3-5 seconds | Sharp hissing sound |
| Heating phase | 50-65 seconds | Smooth whirlpool motion |
| Tapping and swirling | 10-15 seconds | Break up large bubbles |
| Total steaming time | 60-90 seconds | Microfoam integration |
Best Milk for Cold Foam
Not all milk froths equally. Whole milk produces the creamiest, most stable cold foam because of its fat content. The fat helps stabilise bubbles and creates a richer mouthfeel.
Skimmed milk froths less effectively, it creates larger, less stable bubbles that collapse quickly. Semi-skimmed milk sits between the two and works reasonably well.
Plant-based milks vary widely. Oat milk froths well and produces a creamy foam similar to dairy milk. Almond milk and coconut milk are thinner and produce less stable foam.
For the best results with cold foam, choose whole milk or a plant-based alternative like oat milk that's specifically formulated for frothing.
Milk Steaming Temperature and Control
Temperature control is critical when steaming milk. The ideal range is 55 to 75 degrees Celsius. Milk begins to scald above 75 degrees, which damages the milk's proteins and creates a burnt, unpleasant flavour.
Below 55 degrees, the milk hasn't heated enough to fully develop sweetness. Milk sugars become more pronounced as temperature rises, so properly steamed milk tastes noticeably sweeter than cold milk.
A thermometer is invaluable for learning. The Sage The Temp Control Milk Jug includes an integrated temperature indicator strip showing the optimum range between 55 and 75 degrees Celsius, giving you visual feedback as you steam.

Without a thermometer, feel the pitcher's heat.
Overheating milk is one of the most common mistakes. It reduces sweetness, creates a thin foam, and produces an unpleasant burnt taste. If you overheat, start with fresh milk and try again.
Which Should You Choose: Cold Foam or Steamed Milk?
The choice depends on your drink type and preference. Both have distinct advantages and ideal use cases.
For Hot Drinks
Steamed milk is the clear choice for hot espresso-based drinks. Lattes, cappuccinos, flat whites, and cortados all rely on steamed milk's silky microfoam to blend with espresso and create the drink's signature texture.
Cold foam can technically be poured over hot espresso, but it melts quickly and separates from the coffee rather than integrating. The contrast can be interesting, you get a moment of cold, airy texture before it dissolves, but it's not the traditional preparation for these drinks.
For hot drinks, steamed milk creates the professional, velvety mouthfeel that defines café-quality coffee.
For Iced Drinks
Cold foam dominates here. Iced coffee, cold brew, and iced lattes benefit from cold foam's light, airy texture sitting on top. The foam doesn't melt into the drink, so it provides a distinct textural layer.
Steamed milk can be used in iced drinks, but it cools down quickly and loses its microfoam structure. Cold foam maintains its texture throughout, making it the better choice for cold beverages.
Texture and Mouthfeel
Steamed milk's microfoam is velvety and silky. It integrates throughout the drink, coating your mouth and creating a smooth, luxurious sensation.
Cold foam is light and airy. It sits on top, creating a distinct textural contrast with the coffee below.
If you prefer a rich, integrated texture, steamed milk wins. If you prefer a lighter, more delicate texture with distinct layers, cold foam is better.
For home baristas serious about milk preparation, investing in the right equipment makes a significant difference. The Glass Milk Frother MS802 produces the finest, creamiest cold foam for iced drinks, whilst a quality steam wand delivers the control needed for perfect microfoam on hot drinks.
The difference between cold foam vs steamed milk for coffee comes down to temperature, technique, and drink type. Cold foam excels with iced beverages and requires minimal equipment, just a frother and cold milk.
For baristas building their home setup, Coffee Craft Studio offers purpose-built equipment for both techniques. Explore our milk frothing and steaming equipment and elevate your coffee crafting experience with precision tools built for consistent results.
Frequently Asked Questions
What is the difference between cold foam and steamed milk?
Cold foam is aerated milk created by whisking or frothing cold milk until light and bubbly, then layering it on top of hot or cold coffee. Steamed milk is heated using a steam wand, incorporating air to create microfoam, a dense, velvety texture that blends throughout the drink. Cold foam sits on the surface; steamed milk integrates into the beverage. Cold foam works best on iced drinks and cold brew, whilst steamed milk suits hot espresso-based drinks like lattes and cappuccinos.
Can you put cold foam on hot coffee?
Yes, you can add cold foam to hot coffee, though the contrast between cold foam and hot liquid will cause the foam to melt quickly. Some people enjoy this effect for drinks like Americanos or filter coffee, as the cold foam gradually dissolves, creating a lighter mouthfeel. However, cold foam is specifically designed for iced drinks where it maintains its texture longer. For hot drinks, steamed milk with microfoam typically delivers better flavour integration and a more consistent experience.
Which milk is best for cold foam?
Whole milk produces the richest, most stable cold foam because of its fat content and protein structure. Semi-skimmed milk also works well and creates a lighter foam. Skimmed milk can foam but produces less stable bubbles. For dairy-free options, oat milk and soy milk perform excellently, oat milk creates particularly creamy foam. Almond and coconut milk are less reliable for cold foam. Cold milk (straight from the fridge) froths better than room-temperature milk because the cooler temperature helps stabilise the bubbles.
What temperature should milk be when steaming for coffee?
Heat milk to between 55-75°C for optimal steamed milk texture. Most baristas aim for 60-65°C, which creates smooth microfoam without scalding the milk. Overheating above 75°C damages milk proteins, creating a thin, watery texture and reducing sweetness. Using a thermometer, like the Sage The Temp Control Milk Jug available at Coffee Craft Studio, helps you monitor temperature precisely and develop consistency. Never let milk exceed 80°C, as this significantly degrades flavour and foam quality.
Can you make cold foam without a special machine?
Yes. You can make cold foam using a simple hand-held milk frother, a jar with a tight lid (shake vigorously for 30-60 seconds), or even a whisk. A hand-held frother like the Glass Milk Frother MS802 is affordable and effective for home baristas. The key is adding air to cold milk whilst keeping it cold, any aeration method works. Electric frothers are faster and more convenient, but manual methods are perfectly viable if you're patient and willing to put in some effort.